Documentation
Cookbook: SSL, TLS and certificates
This section answers some general questions and details the procedure to generate SSL keys.
Configure vServer SSL Certificates
To start serving HTTPS traffic from Cherokee you will have to enable SSL support and obtain a signed certificate (or signed your own). Ensure that the certificate files have the appropriate permissions for your OS and that you know the locations of the following:
-
Signed Certificate file
-
Private Key file used to generate CSR for the above
-
CA List or Chain file (Optional, depending on signing authority of your certificate)
All files should be generated using PEM-encoding.
Configuration
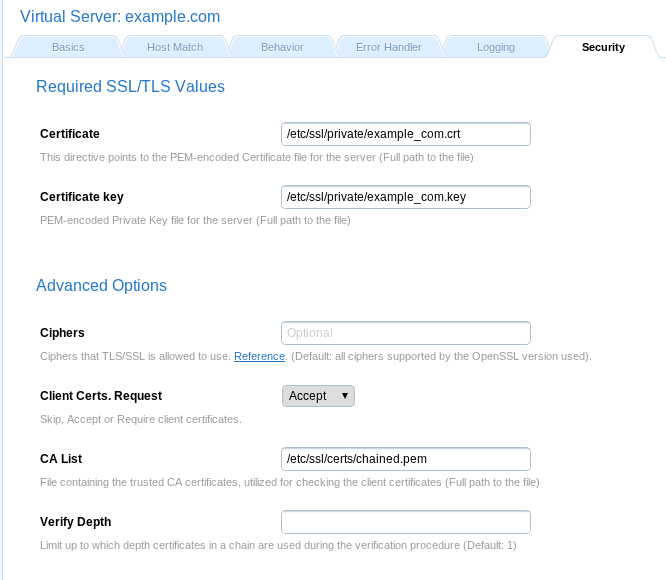
Certificates are configured at the vServer level in the Security tab. This means you must have a vServer setup that corresponds to your Certificate’s security scope. Enter the full paths for your Certificate and corresponding Private Key file. To add a certificate chain file to you CA List set Client Certs. Request to Accept then put the full path to your chain file in the CA List box.
General questions
Can the same server provide HTTP and HTTPS?
Yes. HTTP and HTTPS use different server ports. The former binds to port 80 and the latter to port 443, so there is no conflict between them. To provide HTTPS you will need matching certificates.
Keep in mind that to have one of your virtual servers with HTTPS enabled you will need to configure HTTPS settings for all of them.
Which port does HTTPS use?
HTTPS can run on any port, but the standards specify port 443. That’s where any HTTPS compliant browser will look by default. You can change that by specifying another port in the URL. For example, https://example.com:8080/ would look for an HTTPS server on port 8080.
Can one host handle HTTPS requests for multiple virtual servers?
Yes, it can. This is a common question because a web server cannot see the hostname header when the HTTPS request is being processed. The user entered host part of the URI must match the Common Name (CN) provided by the certificate. Since virtual hosts are in use, the CN of the first available certificate may or may not match the one specified in the early stages of TLS negotiation.
Fortunately this can be overcomed by using SNI (Server Name Indication), which places the host information in the SSL handshake. If the web server is accessed through a web browser that supports SNI, things will just work. Every modern web browser does.
For legacy scenarios where using SNI if not possible, there is a workaround detailed in the next question.
Are there workarounds when SNI can’t be used?
Using SNI is the clean and standard way to go. For legacy scenarios where using SNI is not and option, Cherokee supports a workaround. The mechanism requires the web server to listen to several IPs, and to assign a specific one for each virtual server. This can be done through the Match tab of the virtual server configuration, by assigning an IP-method to the desired IP. Remember that the list of virtual servers is evaluated from top to bottom, so in case you specify the same IP for several virtual servers, only the first one will actually match. In case you need more flexibility than that to match your domains, you can always add more than one matching criteria on that section. An IP/Subnet match plus a simultaneous wildcard match is a combination likely to cover every corner-case scenario you are presented with.
How to enable the SSL support?
SSL support is not enabled by default. You will have to perform three straightforward actions is order to enable it:
-
The first step is to enable a TLS/SSL engine. The option is located in the General configuration setting. Cherokee is shipped with a libssl plug-in.
-
Once the engine is configured, a new binding port must be configured. By default, HTTPS uses the port 443. Remember to add this port, and to check the TLS toggle button.
-
The next step would be to assign SSL certificates to the virtual servers, starting with the default virtual server. Cherokee uses SNI to distinguish between virtual servers. The certificate specified in the default server will be used in the first negotiation. If not present, the startup sequence will fail. The configuration is found inside each virtual server configuration, under the Security tab. Only two fields are required for this to work: ‘Certificate` (the certificate itself, which contains the public key and other data and is fed out to clients to initiate a secure session), and Certificate key (the private key that should be protected at all costs from anyone gaining access to it). Your mileage may vary, but assuming you are using a self generated certificate created with the script provided with Cherokee (more on this later on this same document), you would have two files, cakey.pem and cakey.key’. Just provide the full path to cakey.pem for Certificate, and cakey.key for Certificate key.
-
This last step applies only if your certificate is not recognised by the root CA and you don’t want your visitors to manually have to accept a security exception so that your certificate can be validated. To correctly address this situation you need a CA-signed certificate. Furthermore, computers will trust the root CA, but don’t normally know about the intermediate CA that actually signed your certificates, so you will need an intermediate file which links such CA to a higher-level CA that works with all browsers and operating systems. You’ll need a chained certificate file in order to instruct your visitors on how to follow the chain of trust. You can reed more about chained certificates later on this document. You will only have to concatenate the certificate files and put the combined text into a file used for the the Certificate field. This part is very important: you have to concatenate your certificates into a single file in order to use them in Cherokee. The order in which you concatenate the files is important. Just issue the following command and you should be ready to go:
cat public.pem inter_ca_public.pem > chained.pem
I get certificate errors when having more than one. Workarounds?
This is a scenario known to happen only with some web browsers running specific Operating Systems. Specifically, there was a report where the server was using 2 domains, 2 IPs, and 2 SSL Certificates on one server. Everything worked as expected with Firefox, Opera, and Chromium, but IE/Chrome on Windows kept showing a certificate error on the domain that was not configured as default.
The workaround consists on creating a dummy default host with the second IP and certificate. The affected web browsers will then fall back to the IP and send the correct certificate.
How to manually test HTTP/HTTPS?
HTTP can easily be tested like this:
$ telnet localhost 80
 GET / HTTP/1.0
For HTTPS it is not so easy because of the SSL protocol between TCP and HTTP. However you can do a similar check with the help of OpenSSL’s s_client command.
$ openssl s_client -connect localhost:443 -state -debug
 GET / HTTP/1.0
You will receive detailed information about the SSL handshake before the actual HTTP response.
A more general command line client is probably a better choice. cURL deals with both HTTP and HTTPS, and performs a bunch of other interesting stuff.
$ curl http://localhost/
$ curl https://localhost/
Private keys and Certificates overview
First some terminology:
-
RSA private key file: a digital file that can be used to decrypt messages sent to you. It has a public component that must be distributed (via your Certificate file) to allow people to encrypt those messages.
-
CSR, or Certificate Signing Request: a digital file containing your public key and your name. It is sent to a Certifying Authority (CA) that will sign it to convert it into a real Certificate.
-
Certificate: contains your RSA public key and name, the name of the CA, and is digitally signed by the CA. A browser that knows the CA can verify the signature and obtain your RSA public key, which can be used to send messages which only you can decrypt.
Does the startup between a non-SSL and an SSL-aware web server differ?
Yes. Although in essence it is exactly the same, if you have a passphrase on your SSL private key file, a startup dialog will asks you to enter it. This can be problematic if the web server needs to be started automatically. In this case, the passphrase can be removed from your private key at the cost of erasing a security layer, which brings additional security risks.
Does Cherokee offer any help for Certificate Generation?
Yes. A script is provided to assist you with Certificate Generation.
Just locate the contrib subdirectory and type:
make-cert.sh
And follow the instructions. It will generate the required files, but you will have to install them manually.
It has been tested and has worked fine every time, but if you don’t find the script or it doesn’t work for you can always follow the rest of the procedure described in this recipe to manually generate the certificates.
Locate CA.pl or CA.sh
-
On Debian or Ubuntu those are usually located under /usr/lib/ssl/misc/
-
On MacOS X, you will find them in /System/Library/OpenSSL/misc/
In any other case `find / -iname CA.pl -print` will help you to locate it.
Create a new CA
     $ /usr/lib/ssl/misc/CA.pl -newca
     CA certificate filename (or enter to create) <press enter>
     Making CA certificate ...
     Generating a 1024 bit RSA private key
     .............++++++
     .......................................++++++
     writing new private key to './demoCA/private/cakey.pem'
     Enter PEM pass phrase: <type the secret phrase again>
     Verifying - Enter PEM pass phrase: <type the secret phrase again>
     -----
     You are about to be asked to enter information that will be incorporated
     into your certificate request.
     What you are about to enter is what is called a Distinguished Name or a DN.
     There are quite a few fields but you can leave some blank
     For some fields there will be a default value,
     If you enter '.', the field will be left blank.
     -----
     Country Name (2 letter code) [AU]:ES
     State or Province Name (full name) [Some-State]:.
     Locality Name (eg, city) []:.
     Organization Name (eg, company) [Internet Widgits Pty Ltd]:Cherokee Team
     Organizational Unit Name (eg, section) []:<Enter>
     Common Name (eg, YOUR name) []:Cherokee Certificate Master
     Email Address []:[email protected]
Generate a certificate request
     $ /usr/lib/ssl/misc/CA.pl -newreq
     Generating a 1024 bit RSA private key
     .....................................++++++
     ...++++++
     writing new private key to 'newreq.pem'
     Enter PEM pass phrase: <another phrase>
     Verifying - Enter PEM pass phrase: <repeat it>
     -----
     You are about to be asked to enter information that will be incorporated
     into your certificate request.
     What you are about to enter is what is called a Distinguished Name or a DN.
     There are quite a few fields but you can leave some blank
     For some fields there will be a default value,
     If you enter '.', the field will be left blank.
     -----
     Country Name (2 letter code) [AU]:ES
     State or Province Name (full name) [Some-State]:.
     Locality Name (eg, city) []:.
     Organization Name (eg, company) [Internet Widgits Pty Ltd]:Cherokee web server
     Organizational Unit Name (eg, section) []:.
     Common Name (eg, YOUR name) []:www.cherokee-project.com
     Email Address []:[email protected]

     Please enter the following 'extra' attributes
     to be sent with your certificate request
     A challenge password []: <Enter>
     An optional company name []: <Enter>
     Request (and private key) is in newreq.pem
Sign the certificate request
  $ /usr/lib/ssl/misc/CA.pl -sign:
  Using configuration from /usr/lib/ssl/openssl.cnf
  Enter pass phrase for ./demoCA/private/cakey.pem:
  Check that the request matches the signature
  Signature ok
  Certificate Details:
        Serial Number: 1 (0x1)
        Validity:
            Not Before: Aug 17 13:12:44 2003 GMT
            Not After : Aug 16 13:12:44 2004 GMT
        Subject:
            countryName               = ES
            organizationName          = Cherokee web server
            commonName                = www.cherokee-project.com
            emailAddress              = [email protected]
        X509v3 extensions:
            X509v3 Basic Constraints:
            CA:FALSE
            Netscape Comment:
            OpenSSL Generated Certificate
            X509v3 Subject Key Identifier:
            14:6A:45:66:A2:EB:73:74:5A:C5:68:80:50:D5:48:94:DD:ED:25:F7
            X509v3 Authority Key Identifier:
            keyid:9E:E0:E2:6E:1B:02:17:F2:72:C9:0D:E3:DA:C9:E1:8F:CE:BC:6E:A2
            DirName:/C=ES/ST=Madrid/L=Madrid/O=Cherokee Team/CN=Cherokee Certificate Master/[email protected]
            serial:00

  Certificate is to be certified until Aug 16 13:12:44 2004 GMT (365 days)
  Sign the certificate? [y/n]:y


  1 out of 1 certificate requests certified, commit? [y/n]y
  Write out database with 1 new entries
  Data Base Updated
  Signed certificate is in newcert.pem
Self signed certificates
It is another way to generate certificate files. Ramon Pons sent this little script to create self signed certificates::
#!/bin/sh
CERTNAME=cherokee.pem
openssl req -days 1000 -new -x509 -nodes -out $CERTNAME -keyout $CERTNAME
chmod 600 $CERTNAME
openssl verify $CERTNAME
if [ $? != 0 ]; then
    \mv $CERTNAME $CERTNAME.not_valid
fi
You can see that, in essence, it issues the following command:
$ openssl req -new -x509 -nodes -out server.crt -keyout server.key
Which would produce a couple of files: the SSL Certificate File (server.crt) and the SSL Certificate key file (server.key).
This server.key does not have any passphrase. To add a passphrase to the key, you should run the following command, and enter & verify the passphrase as requested.
$ openssl rsa -des3 -in server.key -out server.key.new
$ mv server.key.new server.key
You should probably backup the key file and the entered passphrase in a secure location.
Pass-phrase issues
As noted above, if you have a pass-phrase on your SSL private key file, the web-server start up will remain on hold until you enter it. Here is the information needed to change it or even remove it, but bare in mind the security implications.
How to change the pass-phrase on a private key file?
Simply read it with the old pass-phrase and write it again, specifying a new pass-phrase. This can be done withe these commands:
$ openssl rsa -des3 -in server.key -out server.key.new
$ mv server.key.new server.key
How to get rid of the pass-phrase?
The RSA private key inside the server.key file is stored in encrypted format for security reasons. The pass-phrase is needed to decrypt this file, so it can be read and parsed. Thus, removing it removes a layer of security from the web server. It is advised to keep a backup copy of the original file before proceeding.
 $ cp server.key server.key.org
 $ openssl rsa -in server.key.org -out server.key
 $ chmod 400 server.key
Since the server.key now contains an unencrypted copy of the key, if anyone gets it they will be able to impersonate you on the net.
Verifying that a private key matches its Certificate
To view the Certificate and the key run the commands:
$ openssl x509 -noout -text -in server.crt
$ openssl rsa  -noout -text -in server.key
The modulus and the public exponent portions in the key and the Certificate must match. It is difficult to visually check that the long modulus numbers are the same, so this approach can be used instead to obtain the numbers to compare (though it is mathematically less rigorous).
$ openssl x509 -noout -modulus -in server.crt | openssl md5
$ openssl  rsa -noout -modulus -in server.key | openssl md5
To check to which key or certificate a particular CSR belongs you can perform the same calculation on the CSR as follows:
$ openssl req -noout -modulus -in server.csr | openssl md5
Free signed SSL/TLS certificates
Most services will require a fee to provide you with signed certificates, but some services will do this for free on their entry-product line.
You need to make sure that whoever signs your certificate is trusted as root CA on your operating system of choice. One such service that works by default on Windows, Linux, and Mac is StartSSL is one such service, although there are probably others out there.
Chained SSL certificates
What
If your public certificate is signed by a Certificate Authority’s intermediate certificate rather than a root certificate, you will need a chained CA. This is basically a list or path of certificates to instruct your visitors on how to follow the chain of trust. The list contains certificates that form the certificate chain (from the client/server certificate to the root CA certificate).
Why
When using SSL, even a signed certificate can be worthless by itself. This is because the system will trust the root CA, but won’t normally know about the intermediate CA that actually signed your certificates.
Where
Where to go next while following this chain of trust is specified in the chained certificate. The mechanism by which the certificate chain works is actually not that complex. When an unrecognized certificate is received, the certificate chain is used to obtain the root CA certificate. This chain is a list of certificates used to authenticate an entity. The path begins with the certificate of that entity, and each certificate in the chain is signed by the entity identified by the next certificate in the chain. The chain terminates with a root CA certificate, that is always signed by the CA itself. The signature of every certificate in the chain must be verified, all the way from the certificate owner until the root CA certificate is reached.
How
To create a certificate chain file, you simply need to your public certificate and your Certificate Authority’s intermediate certificate together. Assuming your public certificate is public.pem (the certificate that was signed by the Certificate Authority), and your CA’s public certificate (the intermediate Certificate supplied by your Certificate Authority) is inter_ca_public.pem, simply appending both will suffice to create a valid chained certificate.
cat public.pem inter_ca_public.pem > chained.pem