
Documentation
Cookbook: Setting up Mailman
GNU Mailman is the most spread software for managing mailing-lists.
To install Mailman you will have to actually do several things:
-
Install the software
-
Set up your web server.
-
Set up your mail server.
This recipe is meant to be used as a complement of the official installation instructions, not as a replacement, and as such it only covers the section specific to Cherokee: the configuration of the web server.
You should really use the recommended method, which is using the configuration wizard provided by Cherokee-Admin. Simply go to the virtual server list page and click on the Add button at the top of the panel to show the list of available wizards.
Now, you will have to select the Web Applications category, and run the Mailman wizard. You will be asked for some basic parameters about the installation. The new virtual server will be created after this form is submitted. The virtual server configuration will cover the vast majority of the cases. Most probably it will cover your needs, although you are free to modify it as you will. No more configuration is needed after this step.
If you decide to ignore the configuration wizard you can set up everything by hand. Although it is not complicated, this method is not recommended.
Very little configuration is required by Mailman to work. Simply setting up a couple of paths -the location of the Mailman archive and the cgi-bin directory path- should be enough. However the same task can be performed more elegantly if you set up a subdomain just to run the lists. This is the approach we will be taking in the recipe.
Lets assume we want to configure the domain lists.example.net.
-
Add a new virtual server from within the Virtual servers tab. No Document Root is actually needed, so simply point it to an empty directory.
Nickname Document Root lists
/var/www/null
-
Set the pattern to be used by the virtual server through its Domain names tab:
Domain names lists.example.net
Lets proceed with the rules. First delete the ones available. As always, the Default rule is non-erasable. We will be creating some rules. Unless otherwise stated, you must assume they are all Final. Also create them in the specified order, since the order of evaluation is relevant to Cherokee and these are the conditions used during the tests. Creating them in this order will assign a reversed sort, being the last one defined the first one that gets evaluated. Leaving the Use I/O cache on for the Static content handlers makes a lot of sense.
-
Redefine the behavior of Default by selection the handler CGI. And make sure to have the following checkboxes enabled: Error handler, Check file and Pass Request.
Document Root /usr/lib/cgi-bin/mailman/
-
Add a new rule, of type Extensions for the icons. Within the Handler tab, manage it as Static content.
Rule Type Extensions Extensions
ico
-
Add a new rule, of type Regular Expression to redirect things to /listinfo.
Rule Type Regular Expression Regular Expression
^/$
-
Within the Handler tab of the rule, manage it with the Redirection handler. Specify the rule as follows:
Show Regular Expression Substitution External
.*
/listinfo
-
Add another rule for static content. This time for the /images directory.
Rule Type Web Directory Directory
/images
-
And set the Static content handler:
Handler Document Root Static content
/usr/share/images/mailman/
-
And finally, add a rule for your Pipermail archive to be managed, also as a directory.
Rule Type Web Directory Directory
/pipermail
-
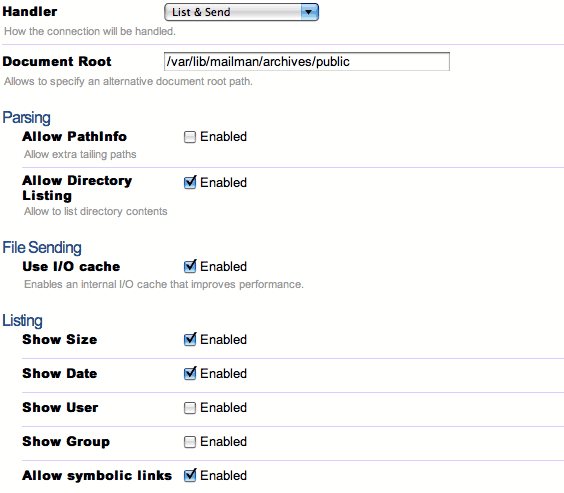
This one must be managed by the List & Send handler.
Handler Document Root List & Send
/var/lib/mailman/archives/public
Resulting configuration
Once you have followed the rest of the installation instructions, you will be able to access your instance of Mailman. If you want to see a live example of the above mentioned configuration, simply visit the Cherokee Project Mailing Lists.