Documentation
Cookbook: How to set up DBSlayer MySQL balancing
Introduction:
This recipe is meant to help in the task of setting up and understanding DBSlayer. This is a handler used to balance the load among several MySQL databases acting as a convenient front end that simultaneously offers great scalability advantages. Refer to the MySQL Bridge handler documentation for the basic information about this subject.
After reading this document you should be able to properly configure and understand this handler. It acts as a proxy for a back end MySQL server (or cluster of server). This proxy can then be queried via JSON over HTTP, and the responses can be given in either one of the following supported consuming languages: JSON, Ruby, PHP and Python, which makes processing the database results almost trivial.
As more than one SQL request can be issued at once -a transaction, for instance-, the responses are returned as a list of results.
Independence:
It is generally a good idea to separate the database balancer from your production web server, both for efficiency and security reasons. The DBSlayer handler can be configured to run under a directory in your current web server, but concentrating the work load on the same box is not recommended. Setting up an independent Cherokee server on another box or port using only the dbslayer handler in its Default rule is a good idea. This will allow having your database balancer fully isolated, which is by far much more secure and easy to monitor and manage.
Keep in mind that each DBSlayer handler can manage a single database (or a set of replicated slaves to balance among). Thus you will have to set up multiple rules in Cherokee, or even multiple instances in different ports, in case you need to use several databases.
The handler can be used to perform both read and write operations, although the balancing part only makes sense for SELECT operations. When performing INSERT operations, keep in mind that DB synchronization must be managed elsewhere. When you perform an INSERT, the Cherokee DB balancer will return a tuple indicating whether it succeeded or not, the number of rows affected, a rollback flag, etc. It will not, however, replicate the operation among each one of you MySQL servers. These arrangements must be made independently using mechanisms suitable for the task.
Remember that balancing database operations is a powerful scaling advantage, but requires some precautions. You must assume the system is stateless. It is not much of a limitation, and it enables the handler to do connection pooling and database access dispatching. MySQL is mostly stateless for the bulk of your queries (SELECT / UPDATE / INSERT / DELETE, etc.), but some commands are meant to affect future commands in the session or may only affect the server currently receiving the command in the balancing scheme. Most notably, these are setting global or session variables, configuring database access privileges and modifying the table structure on a master without replication.
Also, due to the balancing scheme in place, you should be very careful when locking tables or performing transactions. In these cases you MUST perform all the related operations contained within a single query, either using semicolon separators or within a stored procedure. Never dispatch them as separate queries, since your databases will rapidly become unstable.
Security:
As for security concerns, you must keep in mind that the handler is designed for internal secure networks. If you have concerns about exposing your database to the public you will have to properly secure your internal network by using firewalling, binding the running Cherokee instance to a particular interface, tunnelizing your connections and so forth.
We strongly recommend never exposing the MySQL bridge to the outside world. It is also encouraged to forbid the account used by the handler to access the MySQL database from executing dangerous operations like dropping tables or deleting rows. Ideally, the account would only be allowed to run selects and/or some stored procedures. This is totally unrelated to Cherokee and the Database Bridge handler. Using the mechanisms provided by MySQL to enforce the integrity of the database makes sense.
Modularity:
The MySQL bridge does not work alone. It is an integral part of the Cherokee web server infrastructure and, like any Cherokee module, it can make use of the rest of the features provided by the web server.
Thus, you can use the normal loggers to log database access, you can encode the contents served to save bandwidth, you can configure the bridge to use any balancing mechanism provided by Cherokee, etc.
This handler effectively proxies the connections to the databases, and thus Keep-Alive should always remain enabled in the Cherokee instance running the MySQL bridge. Persistence will be correctly handled, and the performance will be optimal.
Replication:
Odds are you want to use a M-M set-up, although that’s entirely related to your database architecture and is something you’ll have to study carefully.
Remember what was said before: The MySQL bridge handler will not manage the replication among each one of you MySQL servers. These arrangements must be made independently using mechanisms suitable for the task.
Configuration:
We will configure a simple setup and show a very basic usage example so that you can go on from there. This example will use a dedicated box running the Cherokee server with the MySQL bridge handler, and will be balancing the load among a couple of independent MySQL servers that are replicating the database in a master-master scheme. You could use only one machine to do all the tasks, run the database and Cherokee managing web pages and the MySQL bridge, but keep in mind what was said above about isolating the boxes and the security measures that you should take into account when migrating to a production environment. Isolation is generally a good idea.
First, we edit the default virtual server. Since we will only be using it for database balancing, we can safely point it to an empty Document Root, in this case /dev/null.

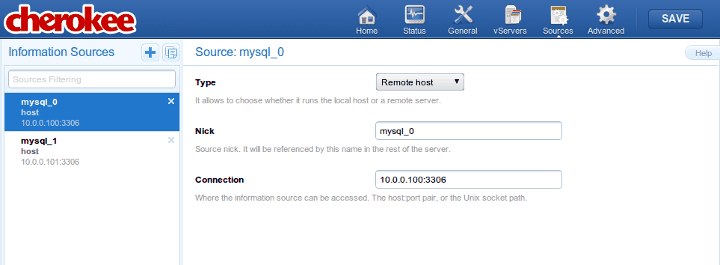
The next step will be setting up the sources of the MySQL information. This means we will have to configure as many MySQL hosts as we like, and the handler will balance the load among them. In this case we will be providing a couple of hosts, each one located in our secure intranet.
Refer to the information sources section for details on how to do this. In this case, the MySQL servers are running on port 3306 of the hosts 10.0.0.100 and 10.0.0.101, so that is what we will use.

Type |
Remote source |
Nick |
mysql_0 |
Connection |
10.0.0.100:3306 |
Type |
Remote source |
Nick |
mysql_1 |
Connection |
10.0.0.101:3306 |
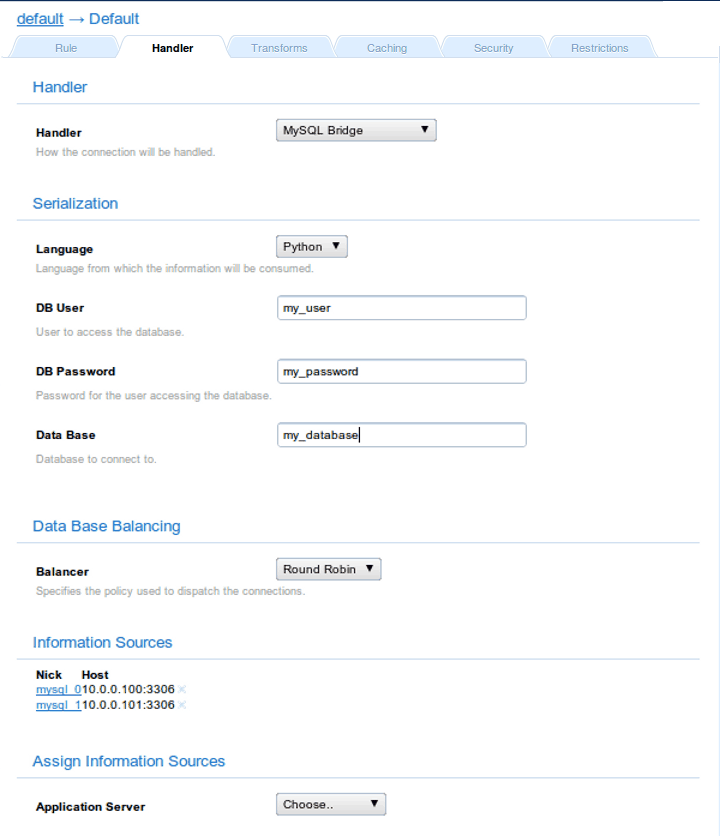
Next is removing every possible rule and configuring the default one to use the MySQL bridge handler. This is not required, but obeys the recommendations stated above.

To do so, simply click on the rule in the Behavior tab and proceed to the Handler section, where you can adjust all the settings.
After adding the information sources to be balanced, and setting up the information required to access an existing database, only the matter of selecting a language will remain. In this example we will be using Python because that is what the testing script will be written in. If your favorite language of choice is not available you can simply select JSON, which is widely supported in most programming languages. Using Python in this case will simply allow us to directly evaluate the results offered by the database, creating a native object that can be managed more comfortably.
Handler |
MySQL Bridge |
Language |
Python |
DB User |
my_user |
DB Password |
my_password |
Database |
my_database |
Balancer |
Round Robin |
Information Sources |
mysql_0, mysql_1 |

And these were all the steps required. You are ready to go!
Example Python script:
The following script is provided to show how you can use the database balancing. It is as simple as it gets. You will only have to change the server name and prepare a database accessible with the parameters detailed above (database name, user parameters and so on).
#!/usr/bin/env python
import urllib

sql="SELECT * FROM my_table;"
query = urllib.quote(sql)

print 'Original:', sql
print 'Encoded:',  query

url      = 'http://localhost/%s'%(query)
response = urllib.urlopen(url)

print 'RESPONSE:', response
print 'URL     :', response.geturl()

headers = response.info()
print 'DATE    :', headers['date']
print 'HEADERS :'
print '---------'
print headers

data = response.read()
print 'LENGTH  :', len(data)
print 'DATA    :'
print '---------'

obj  = eval(data)
print obj
Example PHP script:
This is a simple fetch using cURL:
<?php
  $query = "SELECT * FROM my_table;";
  $host  = "http://localhost";
  $url   = $host ."/". rawurlencode($query);

  $curl = curl_init();
  curl_setopt ($curl, CURLOPT_URL, $url);
  curl_setopt($curl, CURLOPT_RETURNTRANSFER, 1);
  $result = curl_exec ($curl);
  curl_close ($curl);

  eval("\$obj = $result;");
  var_dump($obj);
?>
Please note the variable must be set in the evaluation string, and that a semicolon is needed in order for the string to be correctly converted. This behavior -not adding the semicolon in the generated string automatically- is a design decision taken to make the underlying infrastructure more flexible.
MySQL Wrapper for PHP
To facilitate the use of the MySQL Database Bridge, the PHP-MySQL API has been replicated in a wrapper that can be found under dbslayer/mysql_wrap.php in Cherokee’s source tree. It should provide an easy to use method of benefiting from the advantages offered by Cherokee without having to modify your applications.
You can use it in any of two ways:
-
By directly overriding every mysql_* function call.
-
By prepending cherokee_ to every mysql_* function.
This is controlled when you run the initialization function. By default it tries to override the built-in MySQL functions. If you cannot provide a suitable environment or it simply fails, try passing a FALSE value as the optional second parameter.
The requirements for the wrapper are basically the cURL library.
To override the built-in function, you need to have APD installed.
If you don not, it is as simple as providing the phpize program (bundled with package php5-dev on Debian based Linux distribution) and issuing:
pecl install apd
To use the wrapper you simply have to include the file in your code and initialize it with the appropriate host:port of a running Cherokee MySQL Bridge instance.
<?php

$host="http://localhost:8888";
cherokee_init($host);

/* Add a second parameter if you don't want to override the built-in functions.

cherokee_init($host, FALSE);

*/

?>
From there on the built-in functions should be extended to support Cherokee Bridged MySQL resources as well as the regular MySQL ones.
If you don’t care about mixing regular MySQL resources and Bridged ones, as will be the case in most occasions, you could even skip the manual initialization and simply modify the cherokee_mysql_connect() and cherokee_mysql_pconnect() functions to do the task for you on invocation.
